Tuesday, January 31, 2012

Building a mountain bike Coconino Style #3.

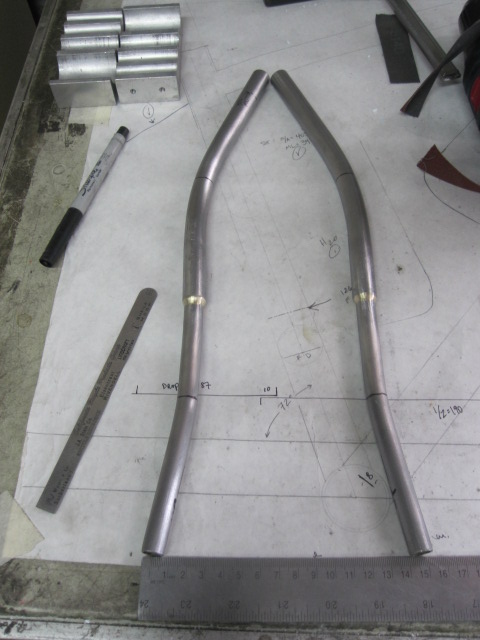
Onwards! Here, you have your seat stays. You either buy them bent or bend them yourself, but bending is another one of those skill sets that is constantly evolving build to build and stay to stay, and has allot of "feel" and the best thing to do is just dive in and start bending.
You can see the sharpie marks? those are the apex of the bends.


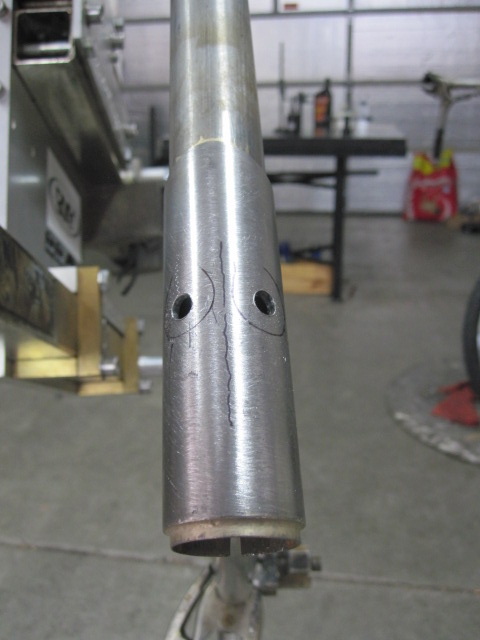
Vent holes have been drilled on the seat tube and on the lower ends of the seat stays, the same as with the chain stays in post #2.


Again, they are mounted in an Anvil fixture for mitering, and are mitered simultaneously.


The stays are then finish fitted at the top, mostly just burr removal, and the marked for slotting, spear pointed and the insides and outsides of the ends cleaned 1st with 80 grit and a dremmel, and then with 91% alcohol, again - much like the chain stays in post #2.

I do one to perfect fit, and then match the 2nd to it.


And, once both stays are on it's back to the alignment table for a check. Usually at this point the frame has enough different triangles that it does not tend to move or wander.

It's good to get it all sussed up at this point as once you install the seat stay brace the entire structure is all tied together.

Plus, it's nice to throw in the test wheel once again to check clearances and find out exactly where you want your brace to go.


the brace is tacked in in the jig with an appropriate dummy axle to prevent the stays from pulling in, and then I check the dropouts one last time before I braze the entire frame at once.


All brazed up! Ready for de-fluxing, polishing and braze ons as well as one last alignment check and off to the painter it goes.


finished brazing. I hope this has helped out!


- Steve Garro.

Monday, January 30, 2012

Long overdue post, 2012.

Howdy, all - I've been both crazy busy with family stuff and bike building, AND, my computer died, and I am struggling to learn the new format (class of 85', yo!)
But, anyhow, here is Jim with his 29er, it's the 3rd bike he has gotten from me and this is specially made to be very light and comfortable for long dirt endurance rides.


And then we have MW's 29er off to Southern Utah, it's going to paint


And lastly, BR's 26" wheeled, breakdown travel bike, going to Barcelona next week - how fun would that be?


Back in action full tilt - Steve.

Thursday, January 19, 2012

Building a mountain bike Coconino style post #2

Picking up where I left off the front triangle is all tacked together, and it's time to check the alignment before I attach the chain stays.


The head tube is off by this much.


......And, the top of the seat tube by this much.

I know my miters are sound, and my bowing has been marked and taken into consideration so I know it's just a matter of (usually) that I simply tack heavier with my left hand - I tack from my chair of course, so I tack with both hands. Sometimes it's spot on from the get-go, but it's no big deal, and I'll make it fine with out bending or cold setting the tubes. Read on.


See all the arrows on the frame in sharpie? (you may have to click on the image) they are where I will place additional tacks to "pull" the frame into near perfect alignment.

The size of the tack, it's location, the amount of filler applied and how hot you make the tack all influence the amount of pull the tack will have on the structure.

I have done really nice tight clean fabrication so I know it "wants" to be straight, I just have to accommodate it to let it be proper.


Like these two tacks I'm going to lay, which have great pulling power - careful!


Click on the picture and you can see the tacks.


And, amazingly enough (I love this aspect) it's all nice & straight.

Everyone has their own ideas and sequences for alignment, some theory and some factual, it's best to find a repeatable sequence which allows you repeatable results.


Waiting for that to cool I have cleaned up the chain stays a bit, it's easier before you tack them on. Again - clean everywhere you will be joining inside and out with 80 grit and 91% alcohol.


See where this is going? the inside tacks are where the chain stays go, and the vent holes are being drilled.


I have one tack - the one you can see - holding on the left chain stay, it's always a few file strokes shorter every time due to the deflection from mitering both stays at the same time in my Anvil chain stay fixture in which the dropouts were brazed as well. Then, you match the right stay to the left and check the clearances for the chain rings and tire and then tack both stays on good and solid at 12:00, 6:00, 3:00 and 9:00.


Checking to make sure the dropouts are parallel to each other - good to go!


......And, making sure that the center of the hub is centered to the BB shell and the rest of the frame. good to go.


making sure everything is all good and that the tire, the rings and the disc all clear.


That's it for now, I was assembling bikes until 9PM last night so I may not go out into the shop today but it's back at it tomorrow with seat stays. Thanks for reading! - Steve.

Tuesday, January 17, 2012

Building a mountain bike Coconino style.

I thought it would be educational to show some of the major steps in building a common mountain bike Coconino style - feel free to ask questions!


First, I have already drawn my blueprint - I'm not about to go into bike design, and while some people use systems like CAD (computer aided design) I prefer to draw a completely accurate life sized blueprint. Also, this is a repeat of a given design, so I'm not even drawing a new print, but re-using the client's existing one "why mess with perfection" as they said...........
So, here I have chosen some main tubes, BB shell and dropouts & chain stays and need to cut the sections needed from the raw head tube stock and the large curved piece of 4130 top tube which I have previously curved on a 3-roller bender. The seat tube sleeve has also been cut from a 8' length of 4130.


Here I have cut the tubing to usable sections very close to the final cutting length, marked bowing and butting, polished the mill scale from the BB and seat tube sleeve, drilled vent holes in the BB, sleeve and head tube piece which has also been faced.


Now, I have silver brazed the sleeve onto the seat tube, drilled holes for the H2O/ water bottle brazeons, and mitered the ST/BB junction.


Mitering the 90* BB end on the down tube on my vertical mill, the block is to keep the two miters in phase with each other.


.......And, then flipped around for the head tube/top tube miter.


Finished fishmouth straight from the machine. A few file strokes & it's good to go.


Cleaning the head tube with 80 grit emery paper and leaving a rough surface to provide "tooth" for the filler to adhere to on a microscopic level - everything is clean-clean. Every tube is cleaned to this level inside and out.


The tiny dots are where the top tube and down tube will connect.


I have set up the jig to all the measurements extrapolated from my blueprint and installed the head tube and BB shell and am checking the down tube to see how the cutting went - *Ca-Chink!* perfect fit!


All tubes are cleaned inside & out with emery paper & 91% rubbing alcohol - grease & contamination are your enemies for clean brazing.


Now, the seat tube junction has been lightly fluxed inside and out and a fillet laid on the front and the back of the BB shell.


Checking the seat tube for straightness - spot on!


Now, I have drilled the vent holes for the top tube and the down tube, drilled the hole for the seat tube slot, and slotted the seat tube to clamp the seat post.


Next, I have mitered, cleaned, fluxed and tacked the top tube in.


And, then the down tube as well, it has also had the water bottle holes drilled and the compound miter hand filed to fit the seat tube.


At this point the seat tube has been "tinned" all the way around, a small fillet of brass has been laid around it and the compound miter with the down tube.


Now I am figuring out the clearances of the dropouts and the chain stays and slotting them by hand with a hacksaw and a thin warding file.


Here is a detail of the "spearpointed" tips of the chain stays, I have drilled 1/8" vent holes in the bottoms of the stays as well to allow first hot gasses to leave and then during the life of the bike allow water to leave and lube to be introduced.


A big box of the new Coco-Motos!


Stay tuned as we move to the back of the bike, and thanks for reading! - Steve.

Thursday, January 12, 2012

And on into January.

JR's bike at the get-go. A straight spine is an absolute requirement to build a straight frame on.


And, fast-forward. I already had the tubes all coped so it was a quick process.
Note the head tube & seat tube extensions for a more upright riding position.


Seat stays ready for mitering.


Final alignment check before the seat stay brace goes in, tying the two sides of the stays together.


All brazed up!


......And, during the polishing process. This will put you on the heating pad at the end of the day after a good number of hours at it.


Nearing full polish - done today & off to paint - I have a few projects at paint......


Old Damn Dog closing in on 16yrs & still full of pep, albeit pretty stiff and gimpy.

She has to watch for people and dogs to bark at now, as she can no longer hear them coming.


I got out biking in Sedona again, It's good to be out after around six weeks of the bike due to a blown-out back. I love washes!


Pete Prebus following me through the AZ cypress trees. Always good to get out biking with the old cycling bros and share stories of the old days racing Creampuff, the golden age of mountain bike racing and desert riding.


Sucky, I know.


Perfect trail conditions.


Building lots of wheels!

I take in wheel builds for non-bike buying clients as well, FYI. Let me know if you want to purchase new wheels, I've been doing it for around 25yrs.

Check to make sure your bike clears the overhang when it's in your car's roof rack!

But - a very interesting case in material fatigue and testing - this bike rode the entire Silk Road from Istanbul to Beijing, was ridden hard mountain biking for years, and the brazes held fine when taken to the ultimate limit.

While being a non-warranty repair it will still live again!

Dogs and cats lying together?


Check out this high strength all weather dwelling made completely of composite materials!

Horse hair, grass and stuffing from the dog bed. Comfy!

Thanks all for reading, and the first of many warnings that we will be out of country from Feb. 15th-March 7th. - Steve.